LUCKY CLOVER
HOLY SHIT I MANAGED TO AFFORD A NAME CHANGE
THERE ONCE WAS A BITTERSWEET
MAN AND THEY CALLED HIM
◅ LEMON BOY ▻
Noah, 30
he/they/itMARKETPLACE
PERSONAL INFOSTORE FAQSMODDING FILESTIPS AND TRICKSTUTORIALS COLLECTION
I made this the carrd theme on impulse idk what to change it to. hi.
sorry if this page looks absolute ass on mobile. why are you on mobilePages last updated: 8/19/2025
Last changed: Added TWI Wolf Big Legs bodymod's rigging file. Various cleanup.
I'm a somewhat stylized, relatively low-poly artist that works in Blender, Clip Studio Paint, Substance Painter, and Photoshop.Feel free to ask about Blender things, I love talkin 3D.
I'm still learning, and hopefully we can learn from each other!
I have ADHD so may be mentally scattered at any given time.
Bad at condensing text, may accidentally paragraph at you.
Text preferred due to audio processing issues.🍀
Busy IRL often due to various health issues,
sorry if I don't always respond asap!Due to 2025 being a god awful hellscape, I've not made anything in a while, so asking for guides on how to do things in Blender or SubPaint may take longer because I have to remember how.⨯⨯⨯⨯⨯⨯
- BONUS CONTENT -
On HRT since early 2019!
About my shop(s) in Second Life

DONUT STEEL
is my old store brand, mostly full of junk sculpts pre-2016. I usually only put pony or chibi/pastel things here, but as I grow old and give less of a shit, it'll probably all go to Found Footage now. In short, this is a defunct brand, and most of it is discounted inworld.

FOUND FOOTAGE
is my new store brand, with more generic or strange items. The theme is kind of like 'watch an unmarked VHS tape for a prize, some are mundane and others a wonder' or something. I sometimes collab with my partner, who owns their own store, Salamandrian!
Looking for more stores? Check out my friends at...
Salamandrian - My partner's shop; hand-painted feral and some anthro mods. They're learning mesh!
GHOST - A good friend of mine's primary shop, he runs a bunch of other stores too! He's talented, give him many money.
WOAH IT'S KINNIES
Old internet person style, 'spiritual' is the best description for my experience in most cases, not otherwise defined.
I do not believe kintypes are chosen, though understand figuring out which term fits best can be difficult.
The funny man
This guy
That guy
Those guys?
Him too
Partial list above, feel free to talk to me about this topic
if you already know what these words mean!
I'm also plural, but my system is currently inactive, friends can ask for more details.
I am not google, nor is google even an entirely accurate resource anymore for this topic, due to decades of playing telephone.
Please be familiar with terms like cameo shifts, otherhearted, fiction flickers, and otherlinks if you wanna chat about this topic.
Also, no, I have no idea where art credit went for these icons, sorry. May remake page in future for that.
Page has several sections, scroll down for the big text to look for whats relevant to you. May re-organize eventually...
Various tips for General SL Usage!
On Caspervend:
When redelivering on Caspervend, you may notice the page has giant white gradients so you can't see the damn product image. In uBlock Origin, add the following to your My Filters page in Settings to remove that gradient and adjust the item label to be cleaner, adding a border to the text.
! Remove white gradients on Caspervend Redelivery page
control.casperdns.com/redelivery##.p-card-content > div > div > div[style*="linear-gradient"] { background: none !important }! Change grey text to outlined white text on Caspervend Redelivery page
control.casperdns.com/redelivery##.p-card-content > div > div > div > div{ color: #fff; font-size: 12px; -webkit-text-stroke: 3px black; paint-order: stroke fill; }
On SL Marketplace:
Searching for new items such as 2k or PBR can be a pain due to people reuploading textures from nonprofit websites for a quick few linden. It's not clear, but you are able to hide these without risking hiding anything labeled '2k textures'. Format the search to exclude the entire category! Several category names are too vague, but try it out.
2k NOT "building and object components" ......(as an example of category exclusion)
This will bring you back to the usual 'can't find shit' levels of Marketplace, instead of struggling with all those texture
re-uploads. Maybe one day we can make it so blocking people on marketplace actually does something...
Various tips for content creation!
General Program Suggestions:
◾ Photoshop for editing, recoloring, chopping textures up, etc.
◾ Alternatively can try the copycat website Photopea. It's tiny, it's cute, it's free, but doesn't have everything.
◾ Some may find Clip Studio Paint ideal for at least finishing textures, such as adding fur and other details that wouldn't be near seams. It is mostly for 2D art or 'simple' UVs though.3D Program Suggestions
◾ Substance Painter is good for painting across seams (like on texture dummies), making alpha masks to finalize in photoshop, baking lighting, seamless patterns... can do entire texturing aspect itself depending on whats being made.
◾ 3D coat is an ok alternative if your textures are more hand-painted.
◾ Blender is for modelling of course, but also can make general textures, alpha masks, spread noise evenly across UVs, etc (use Emit shader). Blender 2.79 is good for a lot of older .blend files / devkits, but many seem to be upgrading to around 3.6 currently. Versions 4.0+ have a lot more features regarding add-ons, but isn't very Avastar-friendly atm.
Also Blender is entirely free, unless you have spare money, in which case it's free and you should donate.Texture Size:
Four 256s can fit in a 512, four 512s can fit in a 1024. If your texture isn't detailed enough to need a 1024, use 512! If your texture requires normal and spec maps, or your mesh could easily be multiple 512s, fit multiple 512s into a single 1024. It will make your texture space well-used, and load faster than several smaller textures. Use 2048 sparingly pls god.
To use this on a model not made for it, set it to 0.5x0.5 texture scale, and change the offsets to 0.25 or 0.75 for their respective squares. I suggest only doing this for personal mods, as it's a little advanced for for-sale modkits.Reminder that not only should eyeballs never be 2048, but LL literally disabled BOM eyeballs from having the ability.
If you buy eyeballs labeled 2k you are not only promoting lag, but are actually probably getting accidentally scammed.
If you are wearing prim/mesh eyeballs to get around the 512x512 bom eye texture limitation... why.Transparent backgrounds in Photos:
Use a static pose on top of a pose stand when available, so your avatar doesn't move. Take one picture with a black background, and one with a white background. In Photoshop (or Photopea), set one copy to 'difference' over the other. Invert if needed, your subject should be white on a black background. Use this as an alpha mask on the original image to erase the background, raise the contrast if needed using Levels to tighten the alpha's edges.
An animated background prim and visual tutorial for this is available at my parcel's sandbox area.Transparency in SL: USE .TGA!!
Make your texture how you want it, then make a copy of the layer. For the bottom layer, make the background entirely opaque, using a filter such as FlamingPear's Solidify or bucket tooling. For the top layer, lock the transparency and make it entirely white, then add a black background under it. Copy this monochrome layer, go into Channels, and make a 'new layer', which will automatically be called Alpha 1. Paste it into here. PROCESS GIF This is doable in photoshop and photopea, but I am not sure what other programs can use .TGA properly.
This page updated periodically, feel free to send me an IM if you want more information on any part of the content creation process in SL.Various Blender Tutorials
I made one, but mostly youtube links otherwiseOther links:
Unicode for Second Life
Internal Texture UUIDsMake your objects copy/mod or I will frown at you, ok?
SPECIFIC FAQS
« FERALS »
« OPENPONY »
« HELLHUND »GENERAL FAQ
!! ALWAYS READ THE NOTECARD !!
IF THE FAQ PAGES DO NOT HELP, SEND AN IM.
I AM NOT NOTIFIED OF MARKETPLACE REVIEWS.
I DO GET OFFLINE IMS VIA EMAIL, BUT SOMETIMES THEY GET LOST. TRY AGAIN LATER!
but please always ask a friend first, or at least read product description... know what BOM is before buying BOM things.
TEXTURES AND GENERAL USAGEHow to I change the textures?
Only a few of my items include texturing HUDs, for ease of use on many faces. However, as I see my mesh to be the 'main product' in most cases, I often give out my textures full permissions. At the cost of having to manually apply them, you can save and edit them freely. You may even give out or resell modded textures for my items, just be reasonable with pricing.
To change the textures, simply right click edit the object, click edit to open the build menu, select face / edit linked as needed, and drag the texture in to the texture window. Most of my items use Blinn-Phong texture panel, but newer ones may include both raw textures and no-transfer Materials to apply to the PBR texture panel.How do I apply no-transfer textures?
In the case that a texture is no transfer, you must drag the object from your inventory to the ground, open the build menu, select the area you are applying to, either with edit linked or select face tools, and drag it into the texture slot.
Most Textures will go to the Blinn-Phong tab, and Materials objects would go in the PBR tab.What is BOM? (Bakes on Mesh)
BOM is a 'revival' of the old system of how SL avatars used clothing and tattoos/makeup, now usable on anything worn. This allows multiple layers of textures to stack onto each other, and be individually re-colorable. When set to BOM, you can wear around 30 different layers, thus we are able to create fully tintable mods and body parts. For further information, check the official Second Life wiki, youtube, or internet search in general.
Note: Layer Order matters. Adjust this by using Outfits tab and clicking on the wrench. Any items involving a pile of layers for full recoloring ability often may come with a numbering system regarding layer wear order, or perhaps different boxes or folders for each layer chunk (ex. 1 base color, 2 base shaders, 3 secondary color, 4 secondary color shaders...)
Because LL only gave us up/down buttons and no click-and-drag for this menu, making re-ordering very very painful, try to add them in the right order first try x_xI don't understand this products instructions!!!??!
- Did you check the Specific FAQs above? Did you ask a friend or two? Did you keep at it a bit before you looked here? Did you see if the Feral Linking Tutorial was relevant at all? If you've gone through these checks, and-or think it's a bug, IM me! I get offline IMs sent to my email, unless SL eats them, in which case you can try again next day. I'll do my best to get back to you!Please do not IM me asking for entire tutorials on things like how to link a prim or wear a tattoo layer.
If my notecards are unclear, there are many guides online regarding linking, unlinking, renaming, and how BOM works.
Although I greatly appreciate your business, on a personal level I do suggest understanding something before buying it.COMMISSIONS AND CUSTOM WORKAre your commissions open?
My inworld profile will say if they are. Prices depend on the complexity of the object, and they are often closed because of my energy levels and IRL situation. I do not have standard starting prices, give me a starting offer instead.
I am open to suggestions, though being written down does not make them instant priority.All commissions are either sold publicly afterwards, or I give you the .blend and texture files directly to upload yourself.
In the case of wanting the commission to not be sold to others, please keep in mind that offers like $40 for a part is basically nothing compared to years of piling up $2+ per person forever until SL shuts down. Offer appropriately.Payments can be through PayPal or CashApp. I have Venmo and Ko-Fi but haven't used them yet, so only as backups.
Lindens acceptable as payment but has the biggest processing fee, so consider this when thinking on appropriate pricing.Can I get [Model, no-trans textures, etc] full perm?
No. Texture mods (where the textures are the main product) and my 3D models will not ever be full perms.
I do not approve of my models being ripped and edited/ported to other games, as you are technically buying a license to use them tied to your SL account, same as any other item.Regarding people who want to rip textures for modding... I heavily prefer any texture edits to be saved as their own bom layer, so the original texture is in no way reuploaded. An example of this would be something like using my mods marking placements to more easily place your additional markings, so it looks as intended when your markings is worn as it's own tattoo layer, reducing nudging multiple temp textures around.That said, 'ripping' anything at all from SL does break TOS, so if you go digging around in your texture cache, at least ensure you're being respectful and reasonable with whatever you do back there. Respecting the rules and respecting the artist are different things, ideally you do both, but I'm not a cop.A safe alternative for things such as BOM add-on markings would simply be screenshotting the Blinn-Phong texture preview in the edit menu and scaling it up, like we did in the good ol' days of furry modding. It's not technically ripping, since you can't get the full original texture resolution, and in many cases it's enough for adding things with minimal adjustments.If what you want is something more like a hue shift, ask! If I still have the modkit's PSD, I don't mind very basic recolors in most cases, such as stripes or spots, but with full recolors, tips appreciated. I currently have no plans to convert old per-color mods to be fully tintable white BOM kits, and also it'd be unfair to do so for anyone who bought multiple colorways.
PSD AND BLEND FILES

Note: I am pretty disorganized.
If you are looking for a file that isn't here, ummm you can ask, but no promises I can find it!!
Also if anything is broken, let me know...WARNING: My blender files are typically version 3.6+ to current (4.5+) range.
If something doesn't work, try a newer blender or avastar version!
PSD FILESAccessories, holdable
Meat Bag
Accessories, wearable
All GlassesBody Parts
Notchbunny Ears
Xeno Ears
Vapofox Tail and FinsFurniture and Decor
CondomsVarious NSFW
Cocktail
Generic Nipples (Mammalia)
T-Dick
RIGGING FILESFurry General
Crux Tail (Thicc Fox)
Crux X Belly Mods
Felitaur FatcatPony General
Ponkey Kit
Bee-sting BootyFeral General
TWI Wolf Megalo Body
TWI Wolf Big Paws +WarmersATC Cryptosuchus Burger Body
.
MIXED FILES
Has both PSDs and Rigging filesStomper Paws
.
OLD DONUT STEEL STUFFLazy Day Hoodie PSD
FERALS FAQ
For Timber Wilds Industries avatars, though brands such as BRDMRT and ATC use same/similar code.
Other feral avatars on SL may use similar link-unlink systems, such as the MOR Hellhund, though the steps might be slightly different.
Can I get a rigging dummy for this part you made?
Check the modfiles page for files!
Not many people ask for my dummies, so many aren't uploaded. If it's not there, feel free to ask, but sometimes I do lose files!Why does this body part come with different colors by default?
Most of my feral body part mods are default set to BOM, or Bakes On Mesh. Once linked correctly, you can change them to use appliers via the HUD (base and markings), or change the rest of your body to BOM and encourage skin and markings makers to do the same!I'm deformed!!
This is a general question for most feral avatars.
If you are sure it is related to my product (ex. "it worked before!"), ensure you did not remove any scripts/animations without being told to, and your linkset has the right baseprim.
As a more general answer... take off all items, and in the viewer UI go to Avatar > Avatar Health, and click both Undeform Avatar and Reset Skeleton and Animations. This will fix it for you only though, so if you are around others, TP to another sim, click these, then return. If this does not fix the issue, then relog. Make sure you're wearing the deformer objects and AO.Where'd you get [MOD IN AD]???
If it's not a texture mod I'm selling, check my partner's store Salamandrian. They are new to making mods and hand-paint all the fur and scales themselves! They do not sell fully white or fully black mods at this time, however, to protect their shaders.
You can ask them about commissioning custom mods, though!
However, often my ad pics are just simple white mods, probably using the default or minimally edited PSDs that came with the avatar. I don't really intend on selling those 'mods', and encourage you to try to make your own custom mods in this case.What are the main feral avatar brands?
I may refer to some feral avatar makers as having the same or similar scripts, and thus same or similar way of modding them.
This will be in reference to TWI Timber Wilds Industries, BRDMRT Bird-E-Mart, and more recently ATC Around The Corner. The most important thing about them here is just that the way you link the body parts mods on are about the same, as is the HUD instructions in most cases, though the exact way they work may change over time if their scripting systems update.The store Teegle is another of the 'main feral avatar brands', but have entirely different scripts, and don't officially support body mods currently, so honorable mention but otherwise not relevant here. Would love to make body mods for them someday ...How do I get the Hellhund avatar?
You can buy gacha vouchers on marketplace, or be patient, as Zexen has a BOM update planned. There is a temporary fatpack on his marketplace as well, if you have the money for it! The more you buy from Zexen, the faster the free BOM update may come out.
Note that the Hellhund and any other avatars made by M.O.R have entirely different scripts than the above group, but are modded in a similar way via unlinking and re-linking different parts.How do I even use this part?? I don't understand the instructions!
Although it's suggested to understand how things work before buying them, everyone starts modding somewhere!
Here is a video made with TWI avatars in mind, but should help you understand the notecard better for most feral avatar body mods. I hope it is useful for someone, but if not, please ask a friend to help you understand the steps.
OPENPONY FAQ
Openpony?
I don't make much for it yet but if you wandered here without having it, the openpony is free here.
If you enjoy feral avatars in general but want to try a different art style, consider getting it and the free gift card at their inworld store. I'm not sure what to make for it currently, as I'm not very active in the MLP community anymore, but maybe someday!Can I get a rigging dummy for this part you made?
Check the modfiles page for files!
Pretty much no one asks for my dummies, so many aren't uploaded. If it's not there, feel free to ask, but sometimes I do lose files!I put the BOM layers on and they didn't change anything!
Did you enable BOM on the pony? Did you make sure you're not wearing an alpha mask? Make sure to press Add instead of Wear so it layers over your base coat!I can see the BOM layer but it's not in the right place!
Ensure you enabled BOM through the OpenPony HUD, and not through any third-party applier systems. There are now two different layouts, make sure to click the bom button once, not twice. My products currently only work with the first layout.How do I tint these layers?
Right click and edit the universal layer, at the bottom is the tint button, click to open the color picker.The colors are wrong!
Do not tint your pony via the HUD. Make sure it is white! Tint your pony's colors by editing the Universal layer.How to I make the pony BOM?
In the Customization HUD, click Main and Cell, set to pure white, then click the BOM button. Make sure to remove your alpha mask!

Butt?
If you've seen a certain body part mod I made that's not on marketplace, that's because it's In-world Only.
This is both because it is low/no-support (no addons/updates atm) and also I think making ponies visit my weird parcel is fun.
If the link doesn't take you directly to it, go down the hall, past the cafeteria, into the Shop area, and jump down the 'organized by species' hole. The vendor is behind the stairs. :)
This item was commissioned and un-advertised, and I still see ponies buying it. God speed little booty horses, god speed.
All tutorials are for Blender unless mentioned otherwise.
Will likely be either 2.79 UI or 2.8+, but some may need 4.0+ add-ons.My Guides (wip)
Adjusting Mesh Normals (different from normal maps!)
Feral Linking Tutorial for TWI, BRDMRT, AOC, and similarly coded avatars.Other Good Guides
Zexen's tutorial for seamless and UVmapped fluffies (requires UV dummy)
How to make Stylized hair (could be adjusted for hair panels)
Making a tank top with only Blender and Substance Painter
CryBunBun Youtube Channel Various guides and timelapses
Aethel's Dress Tutorial Retopo from Marvelous Designer, optional zbrush segment. Heavy reccomendation!More General (not all SL compatible)
MAR Youtube Channel Beginner tutorials for Blender. I suggest froggy!
CGmatter Youtube Channel Mostly not SL compatible, but interesting.
Blender in 30 Seconds on Youtube Search + Heavily suggesting Youtube-Shorts Block (firefox)
Please note that many 'in 30 seconds' tutorials aren't SL compatible, and are for people already familiar with Blender's interface.
Normals within blender are the faces, edges, and vertices' "directions" they face in, to be short about it. Similarly, Second Life has 'bump maps', which use OpenGL styled baked normal maps, which are different! These affect the normal maps of the object, but can not replace them.This quick guide is for 2.8+ UIs,
if you are using 2.79 or earlier you may need an add-on called YAVNE (Yet Another Vertex Normal Editor).
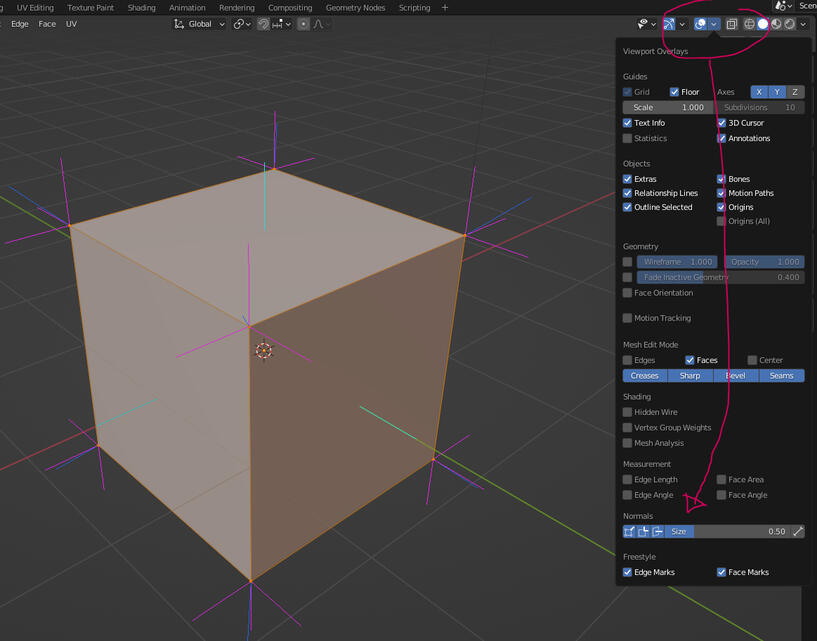
Above is a visual guide to enable the overlays to show where your normals are facing. For most standard models, the only important thing here is the Face direction; they either point outwards, as typical, or inwards, for items like skybox interiors and celshade effects.
It is also important to note that every face on a 3D model can only go in one direction at a time, at least in second life, so you would need to create the interior as well as the exterior if say, you wanted to make a room inside your cube. See Solidify Modifier tutorials on youtube for more on that.
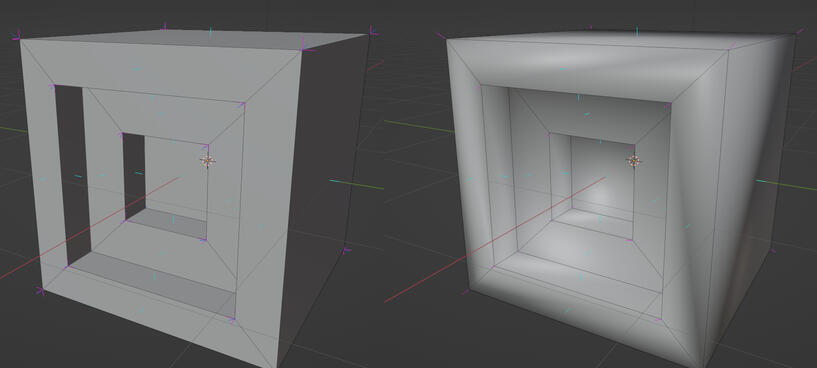
Above, the cubes have the same Normals directions, but the right has been set to Shade Smooth. This can be done by selecting the model in Edit Mode, and using the dropdown Mesh > Shading > Smooth Faces. You can also keep some faces Flat, for example if you want a Smooth cactus coming out of a Flat square plant pot. For our purposes, this can be considered a 0 to 1 binary on the normals weights, and going between those takes more work.
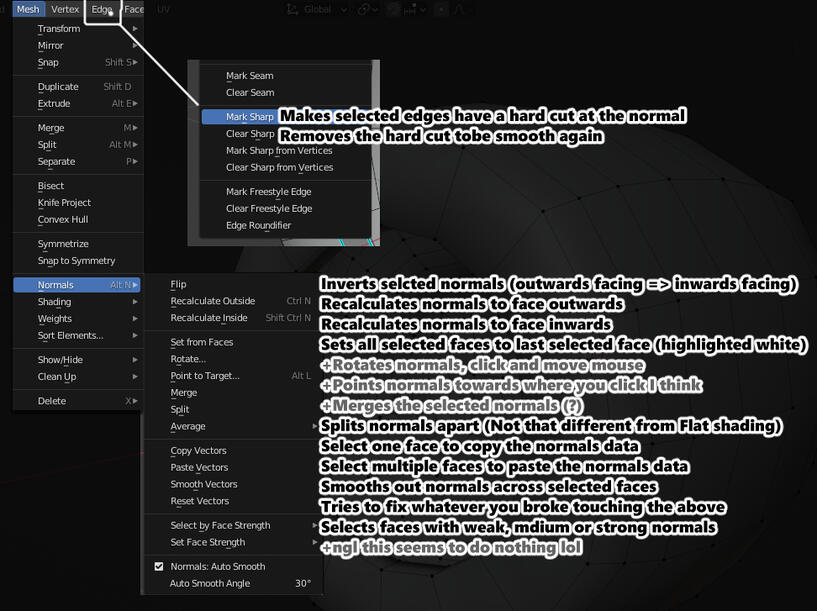
Selecting faces in Edit Mode gives a range of options for the drop-down menu, and to fully control what is hard-cut and what is smoothly blended, you'll want to play with the above buttons. If any edges highlight in blue, that means they have been marked Sharp, and you can use the Edge menu's dropdown to add and remove these marks.